Hello! Each month Sherry London will be bringing The Textile Design Lab an in depth post on how to improve our design process by using technology to its fullest capacity. Sherry has written over a dozen books on Photoshop, Illustrator, and Painter, taught Photoshop, Illustrator, prepress, history, systems design, ballet, and knitting, and been a fiber artist, digital artist, graphic and surface pattern designer. It is an honor to have her here! This is an abbreviated version of a longer tutorial available to members on The Textile Design Lab. Learn more about this online community here, and register for your spot to gain access to this full post along with e-courses, webinars and other great content.
In today’s lesson Sherry will explain how we can modify our sketching process to improve the final digital form. Enjoy! -Michelle
Many designers live with a sketchbook in hand and need to transfer the sketches to the computer for further development. I’m a computer geek and tend to start on the computer—unless I am thinking at the kitchen table. Then I just grab the nearest surface (typically a paper towel) and start doodling.
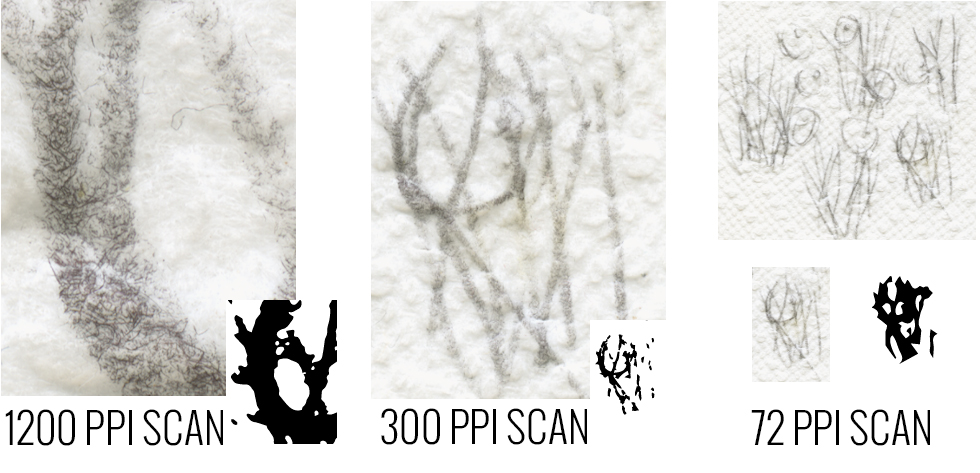
I can’t begin to tell you how wrong that is! Paper towels provide a really rotten surface for a scan unless you actually want the design on the paper towel (in which case you are violating the manufacturer’s copyright). Below, you can see my original sketch (at 72ppi) and it wasn’t impressive at best. It was really only a reminder for me to try something that looked like oversized blueberries on winter-bare plants in a bog. Along with each resolution scan (72, 300, and 1200 ppi), you can see a small extract to size and the best Image Trace I was able to get from that extract. Nothing in that paper towel sketch was even remotely usable.
I wish I could tell you that if you use a Micron 05 pen and Canson paper, you’ll always get exactly the scan you want and a perfect Illustrator Image Trace. Unfortunately, it’s not that easy. Using a Micron 05 and Canson paper will always give you a lovely, clean Image Trace (assuming that your sketch is lovely and clean), but that might not be what you want. So, let’s look a bit more closely to the factors that influence getting clean, precise shapes when Image Traced in Illustrator.
Each potential project has four main variables (with many sub-parts) that directly influence the translation of your physical sketch into digital form: Intention, Sketch, Scanner, and Tracing Method. Not every project uses all four variables, however. Let’s look at each category in turn.
Intention:
The most important thing to ask before you start to sketch is what you want to do with the sketch once you create it. Will this turn into a painting? Do you want an outline to manually trace with the Pen tool or do you want to preserve your sketch as is—with all of its variations and imperfections—so that you can keep a hand drawn element in your vector work. Do you even want this to become a vector image? If you’re sketching as a first step to creating a watercolor image, you might want to eventually scan it, but you’re unlikely to want to put it into vector format (that that still might be possible).
Sketching:
Once you know what you want from your sketch, you can decide what materials to use for it. You have control over the paper texture you sketch on, the media you use, the size of the sketch, the width of your line art if that’s what you draw, to mix media or use a single pen, and how much overlap between objects in your sketch. Each of these factors influences your final sketch (and final output).
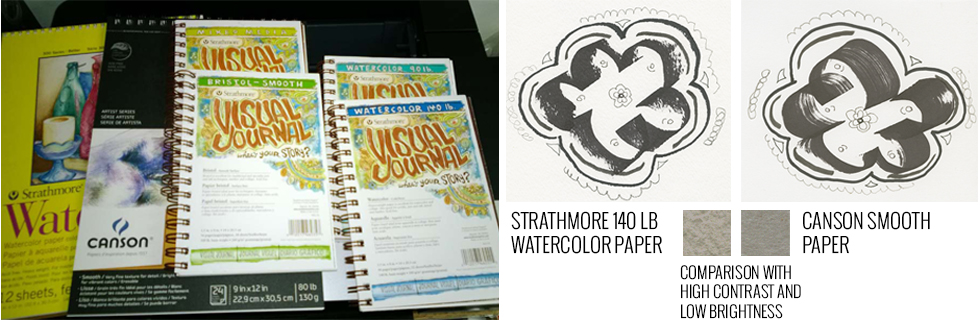
Drawing paper comes in many sizes and shapes. The main thing you need to consider is the texture of the paper. The smoother the texture, the less noise you get when you scan the image and the easier your scan will be to trace.
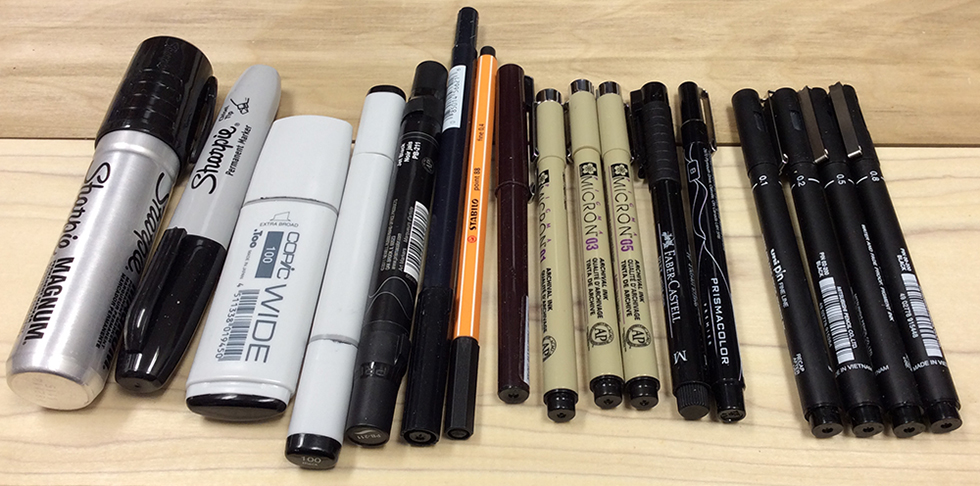
Your media choices—just for black pens—are huge. If you want a clear scan with the best chance of tracing it well, you do need to use a black pen. Every artist finds a pen that “just feels good” and whichever black pen it is, is fine. I have an assortment of Micron, Pitt, Faber Castell, and Pin pens (these come from the UK) that I use on a regular basis. I love my one Stabilo pen and wish it came in more sizes. I also have an assortment of large pens, like the Copic Wide and some brush pens, but thin black pens are most reliable for a great scan. You can also draw in pencil but you need to take care that you don’t smudge the pencil and that the lines are dark enough to scan.
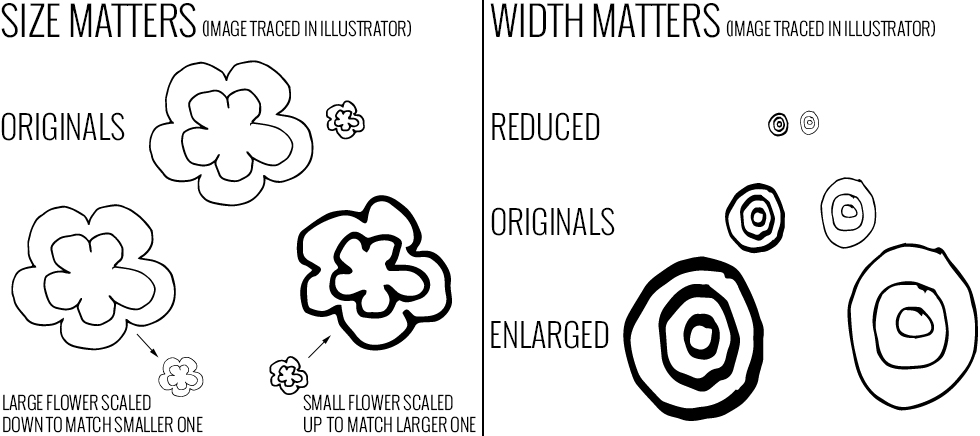
Both size of the object and the width of the stroke also influence the final result. When you Image Trace an object in Illustrator, unless you choose to create only strokes (in which a lot of the hand-drawn character is lost), the object you scan becomes the baseline of the final tracing. Although you can increase the width of a stroke as you keep the object the same size, if you create fills (which is the normal state), the entire shape thins or thickens when you reduce or enlarge it. The same effect shows up if you use a large vs a thin pen when you draw the object.
The Scanner:
Your scanner is a combination of both hardware and software and these also make a difference to your final result, though usually not as critical a difference as the sketching decisions.
If you already have a scanner, then use what you have. If you need to purchase one, you can choose to buy a standalone or a combination that prints and faxes as well. If your budget extends to getting a standalone scanner, you’ll get much better quality in a single-purpose scanner than in one that tries to do everything.
I have an Epson Perfection V700 scanner. I purchased it in 2004 and it is still almost the top of the Epson line of scanners. It has served me well over the years. You don’t need as expensive a scanner as this if all you’re doing is to scan black and white sketches. If you plan to scan painted artwork, however, you do need a photo quality scanner.
Scanners work by dividing your image into “samples”. Each sample becomes a pixel in the final scan. The more pixels you have in the final scan, the larger your image.
You can calculate the size of the image based either on your scanning resolution or the number of pixels in the image. Your scanner driver determines how it thinks about size. Some drivers give you choice of “web” or “print” scans. A web scan is usually 72 ppi and the print scan is 300 ppi. If you can choose, always scan at print size.

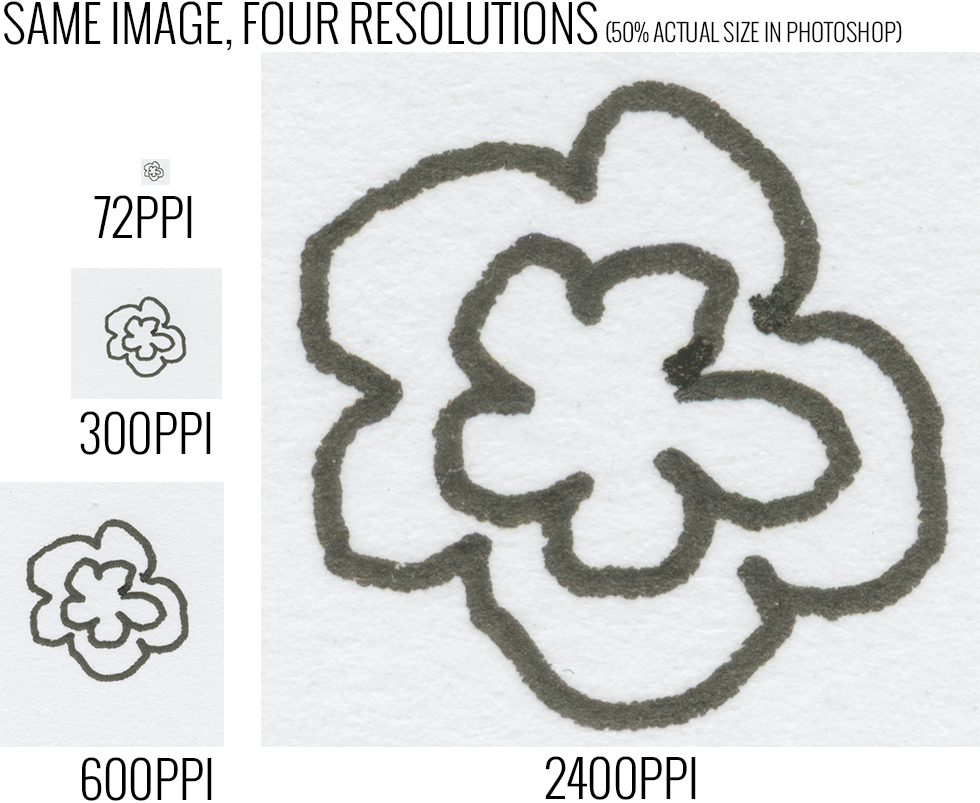
In the next two images, you’ll see the same tiny flower scanned four times: at 72 ppi, 300 ppi, 600 ppi, and 2400 ppi. Since it is the very same image that I scanned each time and my scanner lets me alter the image resolution, all four images have the same physical size if I tried to print them. The number of pixels in the image, divided by the print resolution, gives you the size at which Photoshop will print an image. If the original image was 1 inch square, then 72 pixels divided by 72 equals 1, and 300 pixels divided by 300 equals 1, etc.
Tracing Technique:
Finally! After you made the sketch and scanned it, you now need to trace it. I know that it helps to clean up your scan first, but that’s next month’s blog post.
If you’ve scanned a color image that was a watercolor or pastel or some other blurry media that won’t stand up to becoming a vector image, then you’re done for now. You might need to color correct or touch it up—or put it into repeat, but that goes beyond the scope of today’s blog post.
If you’ve scanned a pen or pencil sketch, you still need to decide whether to make it a vector image or not. That has to be your decision. You always have the choice of keeping it in Photoshop.
If you’ve decided to make a vector image, you still have the choice of whether to trace with the Image Trace command or trace with the Pen tool. Tracing with the Pen tool gives you most freedom, but you will almost certainly lose that hand-drawn feel.
I assume that a sketched look or at least human imperfections are important to you or you would have started on the computer from the beginning. Image Trace is a wonderful tool, within limits. You have a lot of control over the settings in the Image Trace panel. I urge you to always open the panel and not to accept the defaults.
Summary:
I wish I could give you a few (short) magic rules. I can’t—because your needs determine the specifics of your scan and your methods. However, here are some general guidelines:
- Use smooth paper for your sketch.
- Work with a black pen.
- Try to include only those objects you wish trace.
- If possible, only use one pen width in your sketch.
- Pay attention to the resolution and always scan at 300 ppi or greater if possible.
- Adjust the settings in the Image Trace dialog box to control the final look of the image.
Join The Textile Design Lab to gain access to the full post, including a download for the the scans seen here and others.